
The nose plays a crucial role in the overall aesthetics of the face, and many people desire a flawlessly defined nose that enhances their facial features. While plastic surgery is an option for some, makeup can be a powerful tool to achieve a refined and defined nose without going under the knife. From understanding your nose shape to contouring, highlighting, blending, and more, we will guide you through step-by-step instructions, advanced techniques, and troubleshooting tips to help you achieve the perfect nose with makeup. Whether you have a straight, curved, Roman, snub, or any other nose shape, this article will provide you with the knowledge and skills to enhance and define your nose like a pro. So get ready to transform your nose with makeup and unleash your inner beauty guru!
Contouring Techniques for Nose Definition
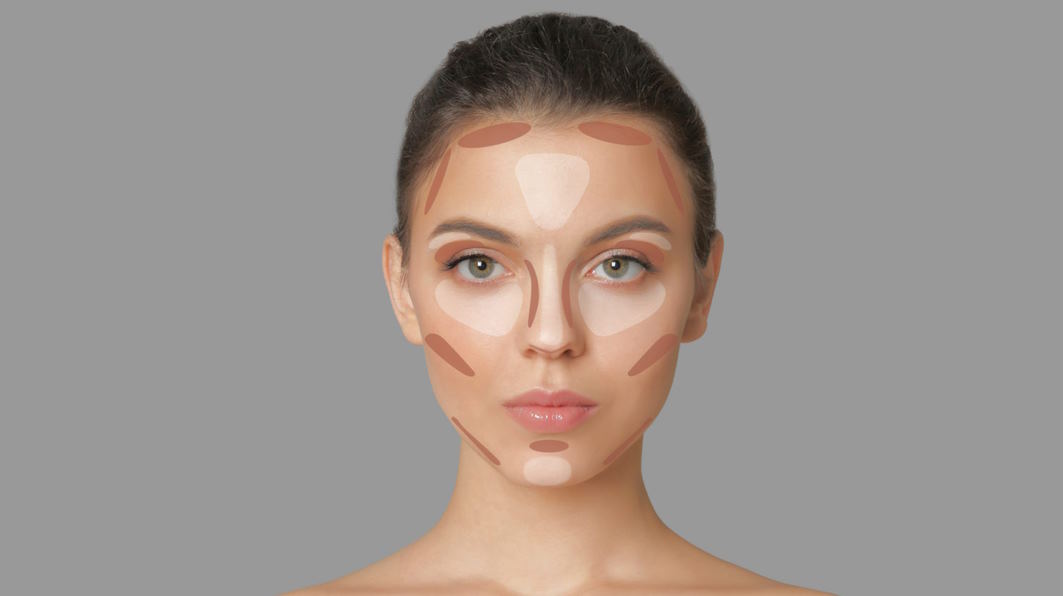
Contouring is a powerful makeup technique that can help you enhance the shape of your nose and achieve a flawlessly defined look. By strategically applying darker and lighter shades of makeup, you can create the illusion of a slimmer, straighter, or more refined nose shape. Here’s how to master the art of nose contouring in a few simple steps.
- Choose the right contouring products: Opt for a matte contour powder or cream that is one to two shades darker than your skin tone. Avoid shimmery or glittery products, as they can make your nose look oily or emphasize its imperfections.
- Prep your nose: Start with clean and moisturized skin. You can also apply a primer or color corrector to even out any redness or discoloration on your nose.
- Identify your nose shape: Different nose shapes require different contouring techniques. For a wide nose, you can shade the sides of your nose to create a slimming effect. For a flat nose, you can highlight the bridge to add dimension. You can contour the uneven areas for a crooked nose to create a straighter appearance. Take a close look at your nose and determine which areas you want to enhance or minimize.
- Apply contour product: Use a small, angled brush or a beauty blender to apply the darker contour product along the sides or bridge of your nose, depending on your nose shape. Start from the inner corner of your eyebrow and blend downwards in a straight or diagonal line, following the natural contours of your nose. Be sure to blend the contour product well to avoid harsh lines and create a natural-looking shadow.
- Blend, blend, blend: Blending is key to achieving a seamless and natural-looking contour. Use a clean brush or beauty blender to blend the contour product into your skin gently tapping or circularly. Pay extra attention to the edges to ensure a soft and diffused effect.
- Highlight strategically: To further define your nose, you can apply a lighter shade of makeup, such as a highlighter or concealer, to the bridge or tip of your nose. This can create the illusion of a higher bridge or a more lifted tip. Blend the highlight product well to avoid any harsh lines.
- Choose the right brushes or tools: The type of brush or tool you use can also affect the outcome of your contour. For example, a small, angled brush is ideal for precise contouring, while a beauty blender can help you blend the product seamlessly. Experiment with different brushes or tools to find what works best for you.
Highlighting Techniques for Nose Definition
Highlighting is crucial in achieving a flawless nose definition as it adds dimension and draws attention to the areas you want to emphasize. By using lighter shades of makeup, you can create the illusion of a more lifted, refined, and defined nose. Here’s how to perfect your nose highlighting technique in a few simple steps.
- Choose the right highlighting products: Look for a highlighter or concealer that is one to two shades lighter than your skin tone and has a subtle shimmer or glow. Avoid using too glittery or overly reflective products, as they can create an unnatural look on the nose.
- Prep your nose: Start with clean and moisturized skin. You can also apply a primer or illuminating base to add a luminous effect to your highlight.
- Identify your nose shape: Different nose shapes require different highlighting techniques. For example, you can highlight the tip for a droopy nose to create a lifted appearance. For a short nose, you can highlight the bridge to elongate it. You can highlight the center for a wide nose to create the illusion of a slimmer nose. Analyze your nose shape and determine which areas you want to highlight to achieve your desired look.
- Apply highlight product: Use a small, fluffy brush or your fingertips to apply the highlight product to the areas you want to emphasize. For example, dab a small amount of highlighter for the tip of the nose and blend it in a circular motion. For the bridge, apply a thin line of highlighter along the center of your nose, starting from the top and blending it downwards. Finally, for the center, apply a dot of highlighter on the widest part of your nose and blend it out towards the sides.
- Blend, blend, blend: Blending is crucial to achieving a seamless and natural-looking highlight. Use a clean brush or fingertips to blend the highlight product into your skin gently. Avoid applying too much pressure, as it can disrupt the foundation or concealer underneath. Instead, blend until the highlighter seamlessly merges with your skin tone.
- Use the right brushes or tools: The type of brush or tool you use can also impact the outcome of your highlight. For example, a small, fluffy brush or your fingertips are ideal for precise application and blending. Experiment with different brushes or tools to find what works best for you.

Troubleshooting and Common Mistakes
Even with careful application, mastering nose definition with makeup can come with its fair share of challenges. Don’t worry, though – we’ve got you covered! Here are some common mistakes and troubleshooting tips to help you achieve a flawless result.
- Uneven contour: One of the most common mistakes is uneven contouring, which can make your nose appear lopsided or asymmetrical. To fix this, use a clean brush to blend out the contour lines gently. You can also use a bit of foundation or concealer to soften any harsh edges and create a more seamless look.
- Overblended highlight: Overblending the highlighter can make it look too subtle or disappear altogether. If this happens, you can reapply a small amount of highlighter and blend it gently using a clean brush or your fingertips. Be careful not to overblend this time and ensure that the highlight is still visible.
- Using the wrong products: Using the wrong products, such as a contour or highlight shade that is too dark or too light for your skin tone, can result in an unnatural or harsh look. Always choose shades that are suitable for your skin tone and undertone. If you make a mistake, you can correct it by using a makeup remover or a clean brush to blend out the product and start over.
- Applying too much product: Applying too much contour or highlight product can result in a heavy or cakey appearance. Remember that less is more when it comes to nose definition. Start with a light hand and build up gradually to achieve the desired intensity. If you apply too much product, you can use a clean brush or a beauty sponge to blend and diffuse the excess.
- Skipping blending: Blending is key to achieving a natural and seamless result. However, skipping blending can result in harsh lines or uneven color distribution. Always take the time to blend your contour and highlight products thoroughly using gentle circular or sweeping motions. If you notice any harsh lines, use a clean brush or a beauty sponge to blend them out for a more polished look.
- Not considering face shape: Your face shape plays a role in contouring and highlighting your nose. Not considering your face shape can result in an unbalanced or disproportionate look. Instead, remember to analyze your overall face shape, adjust your nose contour, and highlight accordingly. For example, if you have a round face, you may need to contour the sides of your nose more to create a slimming effect.